
I am excited to finally be writing this blog post with the directions for you to be able to make your very own Sweetwater Stitching Mat to adorn your stitching space.

This pattern was originally sewn with a few fat quarters of Tula Pink fabric, a 1/4" yard of fabric for binding and my "Florida" stitched piece. The Florida pattern is by Screendoor Needleworks and there are other states available on her site.
*Some of the pieces below are slightly larger for the purpose of being able to sew them together and then trim to exact measurements
**All seams are sewn using a 1/4" seam
A - (1) 5 1/2" x 5 1/2" Cross stitched piece, quilt block or piece of fabric(shown in example)
B- Cut 2 pieces of fabric, 5 1/2"x 2 3/4"
C- Cut 2 pieces of fabric, 10" x 2 3/4"
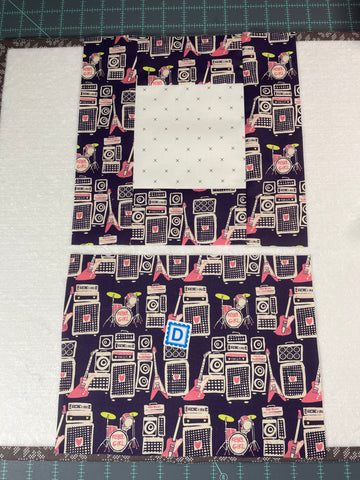
D- Cut 1 piece of fabric, 10" x 7 1/4"
E- Cut 8 pieces of various fabrics, 4 1/2" x 3 3/4"
F- Cut 1 piece 13" x 16 1/2" (pocket)
G- Cut 1 piece 16" x 16" (backing)
Low Loft Batting - Cut 1 piece 6 1/2" x 16 1/2" (for inside the pocket)
Cut 1 piece 16" x 16" (I like to cut slightly larger and then trim after quilting)

Step 1: Sew 1 piece of B to the top of A and 1 piece of B to the bottom of A; press towards B.

Step 2: Sew C to the right and left of the AB piece and press towards C; once you have pressed the seams out trim off the extra.

Step 3: Sew top piece (ABC) to the top of D and press the seam towards D.
Step 4: Sew 4 of the E pieces together along the 3 3/4" edge and then sew the other 4 pieces together in the same way.

Step 5: Sew 1 of the sets of E to the right and 1 set to the left of the middle section; press seams towards the outside.

Step 6: Find the center and trim your mat to 16" x 16" .


Step 6: Prepare your pocket that will cover the bottom portion of the mat.
Fold F in half so that you have a piece of fabric measuring 6 1/2" x 16 1/2" and press at the fold.

Step 7: Place batting inside the fabric and sew 1/4" seam along the folded side; you may also add additional quilting to the pocket. I have added some wide crosshatch quilting to my pocket. Once the quilting is complete trim the excess off the bottom of the pocket to have a piece that measures 6 1/2" x 16". Set aside

Step 8: Make a quilt sandwich with your backing fabric right side down, 16" x 16" piece of quilt batting, and the top of your mat right side facing up and quilt together. I have just done straight line quilting 1/4" from some of the seams. If you have extra batting trim the mat to 16' x 16".


Step 9: Place the pocket over the bottom portion of your mat, lining up the bottom seams and pin. Measure in 4 1/2" from the right and left and mark a line with a marking tool (I like to use a frixon pin that erases with heat). Sew along the line to attach the pocket to your mat.


Step 10: Bind your mat together in your favorite binding method. I have linked some binding videos to help you. Binding Video
Step 11: Use scraps to make covered button needle-minders to add a place to hold your needle.
. 
I hope you enjoy sewing together and personalizing your mat as much as I have.
I also wanted to show another option if you wanted to make the middle portion a panel of fabric instead of having a stitched piece or quilt block in the top center.

If you make one be sure to use the hashtag #sweetwaterstitchingmat so we can all share in the creations :)